Contents
Chào bạn đến với Fx Studio!
Bài viết này đề cập tới một chủ đề nhỏ, đó là Core Location. Và tập trung vào việc lấy vị trí hiện tại của người dùng thông qua Core Location.
Đây là một phần mới nên cũng không cần chuẩn bị gì nhiều.
Bắt đầu thôi!
Chuẩn bị
- MacOS 10.14.4
- Xcode 11.0
- Swift 5.1
1. GPS là gì?
GPS == Global Positioning System == Hệ thống định vị toàn cầu
Hệ thống Định vị Toàn cầu (tiếng Anh: Global Positioning System – GPS) là hệ thống xác định vị trí dựa trên vị trí của các vệ tinh nhân tạo, do Bộ Quốc phòng Hoa Kỳ thiết kế, xây dựng, vận hành và quản lý. Trong cùng một thời điểm, tọa độ của một điểm trên mặt đất sẽ được xác định nếu xác định được khoảng cách từ điểm đó đến ít nhất ba vệ tinh.
Tuy được quản lý bởi Bộ Quốc phòng Hoa Kỳ, chính phủ Hoa Kỳ cho phép mọi người trên thế giới sử dụng một số chức năng của GPS miễn phí, bất kể quốc tịch nào.
(trích Wikipedia)
2. Giới thiệu Core Location
Core Location là framework của Apple được tích hợp sẵn vào trong iOS. Giúp cho ứng dụng của bạn có thể lấy được vị trí người dùng thông qua GPS. Tìm kiếm các địa điểm thông qua toạ độ, hoặc ngược lại. Cung cấp dữ liệu để làm việc với các Framework cho Map (Google Map hay MapKit).
Một số tính năng thú vị từ Core Location:
- Theo dõi vị trí hiện tại của người dùng
- Chạy ngầm ở chế độ background
- Tự động cập nhật vị trí người dùng mới
- Tự động điểu chỉnh cấu hình để tiết kiệm pin khi phải thường xuyên theo dõi GPS
- Cung cấp các API để chuyển đổi từ toạ độ sang địa chỉ và ngược lại
- …
Ta có các class đặc trưng của Core Location
- CLLocationManager
- Lớp quản lý các thao tác khi làm việc với Core Location
- Cấu hình để lấy vị trí người dùng được chính xác hơn
- Yêu cầu cấp quyền từ phía người dùng
- CLLocation
- Chứa thông tin của 1 vị trí
- Latitude : kinh độ
- Longitude : vĩ độ
- CLGeoCoder
- Giúp cho việc chuyển đổi từ toạ độ thành địa chỉ và người lại
- Tìm kiếm dựa trên toạ độ, địa chỉ … của địa điểm
Tạm thời chỉ cần như vậy là oke rồi. Tiến hành sang phần code để tìm hiểu các phần tiếp theo.
3. Request Location Permission
Tạo mới 1 iOS Project, vì demo đơn giản nên sử dung Storyboad hay không thì vẫn không sao. Trong project mới, chuẩn bị 1 ViewController với 2 UILabel và 1 Button

iOS là một hệ điều hành đề cao tính bảo mật và quyền riêng tư của người dùng.
Nên muốn lấy được vị trí hiện tại của người dùng, thì ứng dụng của bạn phải được người dùng cho phép. Mở file Info.plist, thêm 2 thuộc sau:
![]()
Với
- Privacy – Location When In Use Usage Description
- Dành cho function
.requestWhenInUseAuthorization() - Lấy location chỉ khi dùng app
- Nếu app support cho iOS 10 trở về trước thì sài cái này
- Dành cho function
- Privacy – Location Always and When In Use Usage Description
- Dành cho function
.requestAlwaysAuthorization() - Luôn luôn lấy location và cho phép chạy nền
- Dành cho function
Tạm thời thì sử dụng
requestWhenInUseAuthorization
Mở file ViewController.swift, tiến hành thêm đối tượng CLLocationManager và xet delegate của nó.
import UIKit
import CoreLocation

class ViewController: UIViewController {

    @IBOutlet weak var latitudeLabel: UILabel!
    @IBOutlet weak var longitudeLabel: UILabel!

    //MARK: - Properties
    let locationManager = CLLocationManager()

    override func viewDidLoad() {
        super.viewDidLoad()
    }
}

extension ViewController: CLLocationManagerDelegate {

}
Tiếp tục, thêm đoạn code để lấy quyền của người dùng cấp phép cho việc lấy vị trí người dùng.
override func viewDidLoad() {
        super.viewDidLoad()

        //delegate
        locationManager.delegate = self

        //request location permission
        locationManager.requestWhenInUseAuthorization()
}
Cập nhật thêm function delegate của CLLocationManagerDelegate.
extension ViewController: CLLocationManagerDelegate {
    func locationManager(_ manager: CLLocationManager, didChangeAuthorization status: CLAuthorizationStatus) {
        print("location manager authorization status changed")

        switch status {
        case .authorizedAlways:
            print("user allow app to get location data when app is active or in background")

        case .authorizedWhenInUse:
            print("user allow app to get location data only when app is active")

        case .denied:
            print("user tap 'disallow' on the permission dialog, cant get location data")

        case .restricted:
            print("parental control setting disallow location data")

        case .notDetermined:
            print("the location permission dialog haven't shown before, user haven't tap allow/disallow")

        default:
            print("default")
        }
    }
}
Build app và khi lần chạy đầu tiên thì bạn sẽ thấy 1 Alert thông báo như sau:

Nếu như người dùng không chấp nhận yêu cầu. Thì bạn sẽ không thể nào làm được các việc tiếp theo. Như vậy, bạn cần phải thực hiện các công việc thủ công hơn.
Giả sử với project trên, người dùng chọn Don't Allow. Và nhấn vào button Current Location, sẽ tiến hành:
- Kiểm tra trạng thái của việc người dùng cấp phép
- Tiếp tục request quyền truy cập
@IBAction func getCurrentLocationTapped(_ sender: Any) {
        print("Get Current Location")
        retriveCurrentLocation()
    }

    func retriveCurrentLocation(){
        let status = CLLocationManager.authorizationStatus()

        if(status == .denied || status == .restricted || !CLLocationManager.locationServicesEnabled()){
           //show alert để thông báo trạng thái cho người biết
           return
        }

        if(status == .notDetermined){
            locationManager.requestWhenInUseAuthorization()
            return
        }

    }
Apple sẽ reject ứng dụng của bạn nếu bạn cố tình cưỡng ép người dùng phải cấp quyền.
Nên trong trường hợp này, bạn nên hiển thị một Alert để thông báo cho người biết. Việc cập nhật lại quyền thì người dùng sẽ thao tác ở Setting của máy.
4. Current Location
Để lấy được vị trí người dùng hiện tại thì sử dụng function locationManager.requestLocation().
override func viewDidLoad() {
        super.viewDidLoad()

        //delegate
        locationManager.delegate = self

        //request location permission
        locationManager.requestWhenInUseAuthorization()
        locationManager.requestLocation()
}
Tiến hành thêm function delegate của CLLocationManagerDelegate.
- function sẽ được thực thi khi có vị trí mới được cập nhật.
func locationManager(_ manager: CLLocationManager, didUpdateLocations locations: [CLLocation]) {
        if let location = locations.first {
            print("latitude: \(location.coordinate.latitude), longitude: \(location.coordinate.longitude)")
        }
    }
Tuy nhiên, nếu bạn tiếp tục build ứng dụng lại tiếp tục lỗi và bị crash.
5. Handling Error
Bạn thêm function xử lý Error của CLLocationManagerDelegate và tiện thể cập nhật lại giao diện khi có vị trí mới.
    func locationManager(_ manager: CLLocationManager, didUpdateLocations locations: [CLLocation]) {
        if let location = locations.first {
            print("latitude: \(location.coordinate.latitude), longitude: \(location.coordinate.longitude)")
            self.latitudeLabel.text = "\(location.coordinate.latitude)"
            self.longitudeLabel.text = "\(location.coordinate.longitude)"
        }
    }

    func locationManager(_ manager: CLLocationManager, didFailWithError error: Error) {
        print("Error: \(error.localizedDescription)")
    }
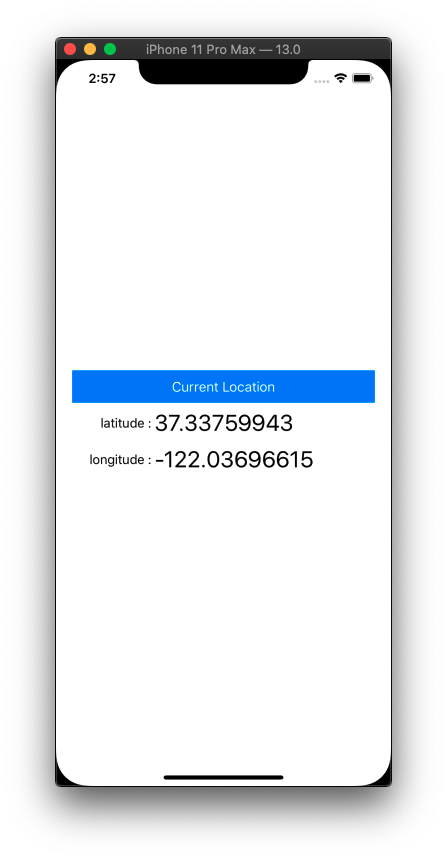
Build và cảm nhận kết quả

Bạn sẽ thấy một số hiện tượng như sau khi chờ dữ liệu xuất hiện trên giao diện:
- Chưa có dữ liệu ban đầu
- Chờ lâu mới có dữ liệu
Do việc lấy current location, sẽ tốn một ít thời gian request tới hệ thống GPS hoặc thông qua mạng internet để lấy dữ liệu. Và nó hoạt động bất đồng bộ với nhau. Nên thời gian lấy được sẽ bị delay đi một ít.
Giải quyết 1 ít vấn đề trên, cập nhật lại cho delegate của CLLocationManagerDeleagte, để request location ngày từ đầu:
func locationManager(_ manager: CLLocationManager, didChangeAuthorization status: CLAuthorizationStatus) {
        print("location manager authorization status changed")

        switch status {
        case .authorizedAlways:
            print("user allow app to get location data when app is active or in background")
            manager.requestLocation()

        case .authorizedWhenInUse:
            print("user allow app to get location data only when app is active")
            manager.requestLocation()

        case .denied:
            print("user tap 'disallow' on the permission dialog, cant get location data")

        case .restricted:
            print("parental control setting disallow location data")

        case .notDetermined:
            print("the location permission dialog haven't shown before, user haven't tap allow/disallow")

        default:
            print("default")
        }
    }
Việc lấy location kiểu như trên, chỉ thực hiện được 1 lần. Và nếu người dùng thay đổi vị trí thì sẽ không nhận được.
6. Updating Location
Tiến hành cập nhật lại function cho Button, với việc thêm vào function cho updating location.
func retriveCurrentLocation(){
        let status = CLLocationManager.authorizationStatus()

        if(status == .denied || status == .restricted || !CLLocationManager.locationServicesEnabled()){
            return
        }

        if(status == .notDetermined){
            locationManager.requestWhenInUseAuthorization()
            return
        }

        // request location data once
        locationManager.requestLocation()
        // updating location
        locationManager.startUpdatingLocation()
    }
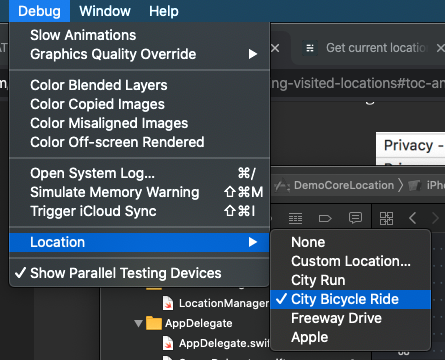
Để có dữ liệu giả trên simulator thì bạn có thể sử dụng cách đơn giản như sau:
- Simulator > Menu > Debug > Location
- Thì sẽ giả lập việc di chuyển

- Để nhập toạ độ riêng của bạn thì có thể chọn Custom Location

- Để thay đổi tới một số vị trí cho sẵn của Xcode cung cấp, thì bạn có thể chọn trực tiếp như sau

7. Config Location Manager
Việc sử dụng GPS để lấy vị trí thường xuyên sẽ rất là tốn pin và nóng máy.
Nên bạn cần phải tối ưu việc lấy vị trí thông qua các thuộc tính của đối tượng CLLocationManager. Ví dụ tham khảo:
        locationManager.requestWhenInUseAuthorization()
        locationManager.desiredAccuracy = kCLLocationAccuracyNearestTenMeters
        locationManager.distanceFilter = 35
        locationManager.allowsBackgroundLocationUpdates = true
Phần này bạn tự tìm hiểu thêm. Tuỳ thuộc vào yêu cầu của project mà chọn cấu hình cho phù hợp.
8. Create & Using Model
8.1. Setup Manager Model
Tại mỗi View Controller, khi muốn sử dụng vị trí hiện tại của người dùng. Bạn lại cài đặt một đống code, đây là điều rất bất lợi và khó quản lý.
Vì vậy, mình sẽ trình bày một Manager Model, bọc việc xử lý về Location lại. Giúp cho việc tương tác được:
- Tập trung
- Đơn giản
Tạo mới một file và đặt tên là LocationManager.swift.
- Tạo class
- Tạo singleton.
- Định nghĩa 1 closure phục vụ cho việc
call back.
import Foundation
import CoreLocation

typealias LocationCompletion = (CLLocation) -> ()

final class LocationManager: NSObject {

    //singleton
    private static var sharedLocationManager: LocationManager = {
        let locationManager = LocationManager()
        return locationManager
    }()

    class func shared() -> LocationManager {
        return sharedLocationManager
    }

    //MARK: - init
    override init() {
        super.init()
    }
}
Thêm các thuộc tính cần thiết cho class:
- Vì cần bọc dữ liệu lại nên tất cả đều khai báo
private locationManager, từ classCLLocationManager- 2 completion cho việc trả dữ liệu khi cần lấy:
- Current Location
- Các location được update
- Một biến trạng thái cho việc updating Location
//MARK: - Properties
    private let locationManager = CLLocationManager()
    private var currentLocation: CLLocation?

    private var currentCompletion: LocationCompletion?
    private var locationCompletion: LocationCompletion?

    private var isUpdatingLocation = false
Tiếp tục, thêm function cấu hình cho đối tượng locationManager.
- Gọi thực thi cấu hình tại hàm
init
//MARK: - init
    override init() {
        super.init()
        configLocationManager()
    }


//MARK: - Private Methods
    func configLocationManager() {
        locationManager.delegate = self
        locationManager.desiredAccuracy = kCLLocationAccuracyBest
        locationManager.distanceFilter = 10
        locationManager.allowsBackgroundLocationUpdates = true
    }
8.2. Location Manager Delegate
Implement các function delegate của CLLocationManagerDelegate.
- Tập trung xử lý việc trả dữ liệu về tại function
didUpdateLocations
extension LocationManager : CLLocationManagerDelegate {
    func locationManager(_ manager: CLLocationManager, didChangeAuthorization status: CLAuthorizationStatus) {
        print("location manager authorization status changed")

        switch status {
        case .authorizedAlways:
            print("user allow app to get location data when app is active or in background")
            manager.requestLocation()

        case .authorizedWhenInUse:
            print("user allow app to get location data only when app is active")
            manager.requestLocation()

        case .denied:
            print("user tap 'disallow' on the permission dialog, cant get location data")

        case .restricted:
            print("parental control setting disallow location data")

        case .notDetermined:
            print("the location permission dialog haven't shown before, user haven't tap allow/disallow")

        default:
            print("default")
        }
    }

    func locationManager(_ manager: CLLocationManager, didUpdateLocations locations: [CLLocation]) {
        if let location = locations.first {
            self.currentLocation = location

            if let current = currentCompletion {
                current(location)
            }

            if isUpdatingLocation, let updating = locationCompletion {
                updating(location)
            }
        }
    }

    func locationManager(_ manager: CLLocationManager, didFailWithError error: Error) {
        print("Error: \(error.localizedDescription)")
    }
}
8.3. Public Functions
Viết thêm các function tương tác từ bên ngoài:
- Request quyền truy cập của người dùng
func request() {
        let status = CLLocationManager.authorizationStatus()

        if(status == .denied || status == .restricted || !CLLocationManager.locationServicesEnabled()){
            return
        }

        if(status == .notDetermined){
            locationManager.requestWhenInUseAuthorization()
            return
        }

        locationManager.requestLocation()
    }
- Lấy
current location, có 2 function- Lấy dữ liệu được lưu trữ. Vì class thiết kế lưu trữ lại vị trí hiện tại mới nhất.
- Lấy dữ liệu mới sau khi request.
- Bạn có thể viết thêm cho phần lưu trữ các location đã lấy được.
   func getCurrentLocation() -> CLLocation? {
        return currentLocation
    }

    func getCurrentLocation(completion: @escaping LocationCompletion) {
        currentCompletion = completion
        locationManager.requestLocation()
    }
- Kích hoạt việc tracking thường xuyên location
- sử dụng function này, thì sẽ luôn nhận được
call back, với dữ liệu là vị trí mới nhất của người dùng lấy được
- sử dụng function này, thì sẽ luôn nhận được
func startUpdating(completion: @escaping LocationCompletion) {
        locationCompletion = completion
        isUpdatingLocation = true
        locationManager.startUpdatingLocation()
    }
- Dừng việc tracking
- Kết thúc việc update thường xuyên
func stopUpdating() {
        locationManager.stopUpdatingLocation()
        isUpdatingLocation = false
    }
8.4. Using model
Tại file SceneDelegate.swif. Kích hoạt việc request location
- Sử dụng singleton của Manager Model
- Gọi hàm request.
 func scene(_ scene: UIScene, willConnectTo session: UISceneSession, options connectionOptions: UIScene.ConnectionOptions) {
        guard let _ = (scene as? UIWindowScene) else { return }

        LocationManager.shared().request()
    }
Tại file ViewController.swift. Sử dụng việc lấy location thường xuyên
override func viewDidLoad() {
        super.viewDidLoad()

        LocationManager.shared().startUpdating { (location) in
            print("latitude: \(location.coordinate.latitude), longitude: \(location.coordinate.longitude)")
            self.latitudeLabel.text = "\(location.coordinate.latitude)"
            self.longitudeLabel.text = "\(location.coordinate.longitude)"

        }
    }
Build app và cảm nhận nha. Bạn có thể checkout mã nguồn tại đây. Chúc bạn thành công!
Tạm kết
- Tìm hiểu về GPS & Core Location
- Request Location Permission
- Current Location
- Updating Location
Related Posts:
Written by chuotfx
Hãy ngồi xuống, uống miếng bánh và ăn miếng trà. Chúng ta cùng nhau đàm đạo về đời, về code nhóe!
Leave a Reply Cancel reply
Fan page
Tags
Recent Posts
- Complete Concurrency với Swift 6
- 300 Bài code thiếu nhi bằng Python – Ebook
- Builder Pattern trong 10 phút
- Observer Pattern trong 10 phút
- Memento Pattern trong 10 phút
- Strategy Pattern trong 10 phút
- Automatic Reference Counting (ARC) trong 10 phút
- Autoresizing Masks trong 10 phút
- Regular Expression (Regex) trong Swift
- Lập trình hướng giao thức (POP) với Swift
You may also like:
Archives
- July 2024 (1)
- June 2024 (1)
- May 2024 (4)
- April 2024 (2)
- March 2024 (5)
- January 2024 (4)
- February 2023 (1)
- January 2023 (2)
- November 2022 (2)
- October 2022 (1)
- September 2022 (5)
- August 2022 (6)
- July 2022 (7)
- June 2022 (8)
- May 2022 (5)
- April 2022 (1)
- March 2022 (3)
- February 2022 (5)
- January 2022 (4)
- December 2021 (6)
- November 2021 (8)
- October 2021 (8)
- September 2021 (8)
- August 2021 (8)
- July 2021 (9)
- June 2021 (8)
- May 2021 (7)
- April 2021 (11)
- March 2021 (12)
- February 2021 (3)
- January 2021 (3)
- December 2020 (3)
- November 2020 (9)
- October 2020 (7)
- September 2020 (17)
- August 2020 (1)
- July 2020 (3)
- June 2020 (1)
- May 2020 (2)
- April 2020 (3)
- March 2020 (20)
- February 2020 (5)
- January 2020 (2)
- December 2019 (12)
- November 2019 (12)
- October 2019 (19)
- September 2019 (17)
- August 2019 (10)


